
How to Refresh Kitchen Cabinets Without Replacing Them: 5 Real Options
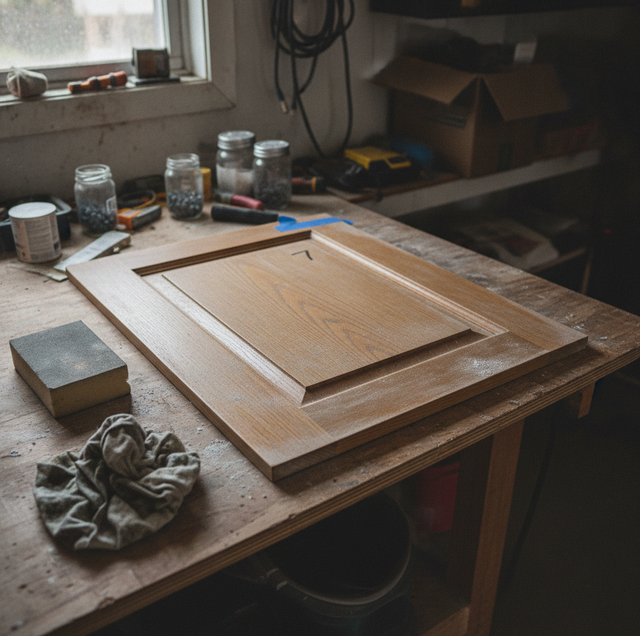
Cabinets set the tone of a kitchen more than any other surface, which is why dated or worn ones make the whole room feel tired, even when everything else is fine. The good news is that the boxes themselves rarely wear out. Solid cabinet frames outlast the finish on their doors by decades, so the fastest way to change a kitchen is usually to change the surface rather than tear anything out. Doing that well is less about the color you pick and more about what happens before the first coat goes on. The result lives in the prep.
Why the Finish Depends on the Prep, Not the Paint
Kitchen cabinets live a hard life that walls never face. Every door and drawer front gets grabbed with hands that carry the oils of cooking, and the surfaces nearest the stove collect a fine, sticky mist of airborne grease that builds up so gradually you stop seeing it. Layer on the constant open-and-close cycling, the steam, and the occasional splash, and a cabinet finish has to survive conditions closer to a car's than a bedroom wall's.
Think of paint on a greasy, glossy cabinet the way you would tape on a dusty surface. The tape looks stuck when you press it down, but it lifts off in a day because it never bonded to the material underneath, only to the film sitting on top. Paint behaves the same way. If it dries over grease or over a slick factory sheen, it forms a skin that sits on the surface instead of gripping it, and that skin peels at the edges the first time a fingernail catches it. Everything that makes a cabinet refinish last happens in the cleaning and scuffing that come before color.
The Refresh Options, Least to Most Involved
Refreshing cabinets is a range, not a single job, and knowing where your kitchen sits on that range saves both effort and regret.
The lightest touch is new hardware only. Swapping tired knobs and pulls for a current style, or adding handles where a kitchen had none, can change the look of a cabinet run with surprisingly little work. It does nothing for a worn finish, but on cabinets whose color still works, it can be enough.
Next is repainting or refinishing, the focus of this article. You keep the existing doors, drawers, and boxes, and give every visible surface a new, durable coat in whatever color you want. This suits solid, well-built cabinets that are simply the wrong color or looking dull.
A step further is refacing, where new doors and drawer fronts go on, and a matching veneer skin covers the face of the existing boxes. Refacing changes the door style itself, not just the color, so it fits kitchens where the doors are damaged, warped, or a shape you no longer want, but the box layout still works.
The heaviest option, full replacement, tears out the cabinetry entirely. It is the right call only when the boxes are failing, the layout needs to change, or water damage has compromised the structure. For most kitchens that just look dated, replacement solves a problem that was never there.
Repainting Cabinets, Step by Step
The repaint process rewards patience at the front and speed nowhere. Here is how the work actually unfolds.
Remove and label the doors and drawers: Take everything off the boxes, unscrew the hinges and pulls, and label each door with tape and a number that maps to its opening. Cabinets are rarely as identical as they look, and a labeled door drops back into its home opening without fuss. Painting doors off the cabinet, laid flat, gives a smoother result than fighting gravity on a vertical surface.
Degrease before anything else: Wash every surface with a degreaser, typically a TSP substitute, to strip off the years of cooking film that sanding alone cannot remove. This is the step people skip and the step that quietly decides whether the whole job lasts. Work in a ventilated space, wear gloves, and rinse as the product directs so no residue is left behind.
Scuff-sand to kill the sheen: Paint needs a slightly toothy surface to grab. A light sanding dulls the existing glossy finish so the primer has something to bite into. On flat panels, sandpaper does the job; on detailed door profiles, routed edges, and tight corners where a sanding block cannot reach, a liquid deglosser dulls the sheen chemically without gouging the detail.
Fill the dings: Fill any dents, gouges, or chips with a wood filler, let it dry, and sand it flush. Every flaw you leave will still be there under the new color, only now lit by fresh paint.
Prime with a bonding, stain-blocking primer: This coat is not optional on cabinets. A quality bonding primer grips the old finish, and a stain-blocking primer seals in tannins and old stain that would otherwise bleed up through the new color as yellow-brown ghosting. Over oak, deeply stained wood, or any previously stained cabinet, the primer is what keeps the finish clean rather than muddy.
Apply a cabinet-grade finish in thin coats: Reach for a durable enamel built for cabinets, such as a waterborne alkyd or acrylic enamel, not a wall paint. These finishes are formulated to self-level, meaning they flow out and settle so brush and roller marks disappear as they dry, then cure to a hard shell. Spray application gives the smoothest result, but a fine foam or microfiber roller for the flats paired with a good brush for the profiles lays down a clean, self-leveling coat too. Two or three thin coats always beat one thick one, which sags and stays soft.
Let it cure before heavy use: Rehang the doors once the finish is dry to the touch, but treat everything gently for the next stretch. Curing is covered in the questions below, and it is the difference between a finish that lasts and one that dents from day-one handling.
Two Materials That Change the Plan
Two common cabinet surfaces need their own approach, and ignoring them is how a good-looking refresh goes wrong within months.
Oak's open grain telegraphs: Oak has deep, open pores, and paint follows every one of them. Even a flawless coat leaves the finish looking like a topographic map of the grain unless you fill those pores first. A grain filler pressed into the wood and sanded flush gives a smooth base; several sanded primer coats can do the same with more labor. Skip it, and you get a painted oak look rather than the smooth finish most people picture.
Laminate and thermofoil resist standard primer: Not every cabinet face is wood. Many are laminate or thermofoil, thin plastic-like skins over a substrate, and their slick surfaces shrug off ordinary primer. Painting them calls for a bonding primer made specifically for slick, non-porous surfaces, which is covered further in the questions below. Match the primer to the material; these surfaces take paint well. Mismatch it, and the coating peels at the edges.
Every choice here, from the degreaser to the primer to the enamel, points at the same goal: a finish that shrugs off the daily contact a kitchen throws at it. Get the surface right, and cabinets you already own can look new for years.
Frequently Asked Questions
Yes. Kitchen cabinets carry an invisible film of cooking grease, and paint will not bond to it, no matter how carefully you sand. Wash with a degreaser, usually a TSP substitute, and let it dwell for a few minutes to break down the oil before rinsing with clean water. Give extra attention to the doors around the stove and the edges near the handles, where the cooking film builds heaviest. Skip that, and the finish peels off in sheets once it dries.
You can, but oak's open pores otherwise read as fine lines straight through the color. The fix is a paste grain filler worked down into the pores, or several coats of a high-build sanding primer sanded flush between each coat. Either one levels the surface so the finish reads smooth rather than ridged. Choose the filler for the deepest grain and the high-build primer when the texture is milder.
A cabinet-grade waterborne alkyd or acrylic enamel is built for the job. These finishes dry to a hard, washable shell and self-level, so brush marks flow out on their own. A standard wall paint, by contrast, stays comparatively soft even when fully dry, so it scuffs, shows finger marks, and marks up quickly under the constant handling a cabinet gets. The enamel is what survives daily contact.
They will feel dry to the touch within hours, but that is not the same as cured. A cabinet enamel keeps chemically hardening for roughly a couple of weeks after it feels dry, and it stays soft and dentable during that window. Close the doors gently and hold off on scrubbing the surfaces or stacking dishes tightly against them until the finish has fully cured; otherwise, you will press marks into a coat that has not yet set.
Yes, but they need the right primer, a shellac-based or bonding formula, because a standard latex primer won't grip the vinyl skin. Thermofoil adds a catch: it often peels at the edges near heat, by the oven or the dishwasher, so any lifted foil has to be repaired or trimmed back before you prime. Once a bonding primer is down over a sound surface, both materials take a durable finish. Skip that step, and the coat fails at the corners first.
They solve different problems. Refacing installs new doors and drawer fronts and covers the box faces with veneer, so it changes the door style and finishes faster because there is no multi-week paint cure to wait out, but it costs more since you are buying new doors and veneer. Repainting keeps the existing doors and recolors them, the budget path, and suits solid, sound boxes. Full replacement only earns its keep when the boxes themselves are water-damaged or sagging.
Book a cabinet refinishing consult — see your kitchen renewed without the cost or mess of replacement. True Coat Painting serves Reno, Sparks, and Spanish Springs. Call (775) 227-0618.
