
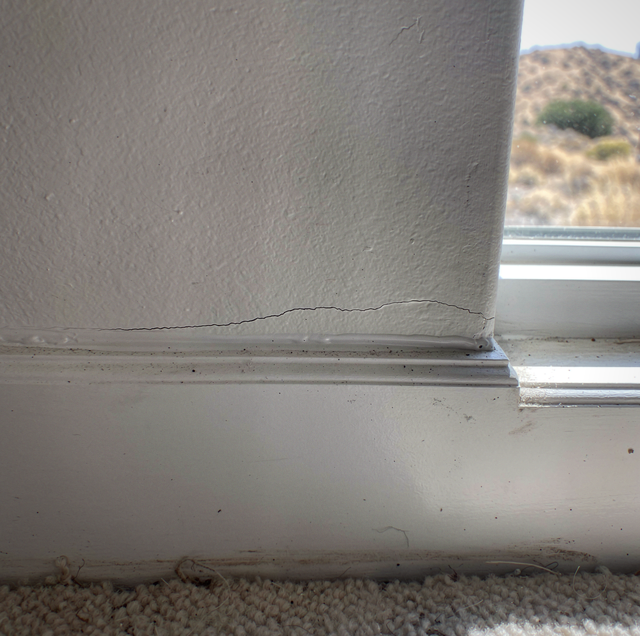
A caulked joint at painted trim is doing one job: bridging two materials that move at different rates, with a paint film sitting on top that has to stretch along with it. Wood trim swells and shrinks, framing settles by fractions of an inch, and a floor flexes under weight, while the wall or the adjoining piece of trim moves on its own separate schedule. The caulk bead is the only part of the assembly built to absorb that difference, so when it fails, the crack itself shows how the joint failed: how a bead lets go changes with where and why the joint stopped moving together. Reading the crack before reaching for the caulk gun again saves a second failed repair.
| What You See | What It Means |
|---|---|
| A hairline split in the paint film only, running along the bead | The paint skin cracked on its own while the caulk beneath is still bonded and flexible |
| The bead torn away from one side of the joint | Adhesion let go on that side; the bead folds at its bonded edge instead of stretching |
| The bead split down its own middle | The bead moved past its own stretch limit while both edges stayed bonded |
| A gap that opens in one season and closes again in another | The joint is still moving inside a bounded range, and the bead is undersized or brittle for that range |
| A gap reopening where the baseboard meets the floor | The floor side of the joint carries its own separate movement and wear |
| A crazed or wrinkled skin on the bead | The caulk was painted, or skinned over on its own, before the material underneath had set |
Why a Painted Trim Joint Moves
Trim is wood or a wood composite, and both absorb and release moisture from the air inside the house. A bathroom that runs humid after every shower, a kitchen that steams up at dinner, and a living room that stays dry all winter with the heat running are three different moisture environments under one roof. The baseboard in each one swells and shrinks across its width by a small, real amount as conditions change. A run of trim in a room that stays close to one humidity level moves only a small amount; the same length of trim in a room with a wide swing between wet and dry stretches the joint on both ends of that swing, year after year.
Framing and flooring add their own movement on top of that. New framing lumber continues to dry out and settle after a house is built, and even an older house sees its joists and subfloor flex a little under normal loads. None of this movement is a defect in itself. The caulk bead exists specifically because two building materials meeting at a joint are never going to move in exact lockstep, and a joint that never moves at all would not need a flexible seal in the first place.
Caulk That Can Flex and Caulk That Cannot
Not every caulk on a shelf is built to do the same job. A paintable acrylic-latex caulk, and the siliconized-acrylic blends that add some of silicone's flexibility to an acrylic base, are formulated to stay elastic once cured and to accept a coat of latex or oil paint on top without the paint beading up or peeling back off. That combination, movement plus paintability, is what a trim joint needs.
Pure silicone caulk is a different chemistry. It stays flexible for a long stretch of time and resists moisture well, which makes it a good fit for a bathtub or a sink rim, but its surface is naturally slick, and ordinary paint beads up on it and runs off. A bead of pure silicone at a baseboard or a trim joint either gets left unpainted as a visible seam, or gets painted anyway and sheds that paint in strips. Reading the label before the bead goes into the wall avoids painting over the wrong product in the first place.
Bead Size and Wide Gaps
A caulk bead has a working range: sized right, it stretches and compresses with the joint and holds; sized wrong, it works against itself. An oversized bead, one tooled on thick to hide a gap that is too wide for caulk alone, has more material shrinking as it cures and more surface area for that shrinkage to pull at once, so it can split down its center while it cures.
A bead deeper than it is wide cures slower at its center than at its surface, so a thick, unbacked bead can look fully set while the core is still soft and prone to splitting later.
A gap that is too wide for a single bead to bridge on its own needs backing before caulk goes in, not more caulk. A foam backer rod pressed into the gap first keeps the caulk bonded to the two faces of the joint and off its back, and holds the bead thin enough to flex as a membrane rather than stretch through its own mass. Skipping the backer rod on a wide gap is one reason a wide joint reopens no matter how much caulk goes into it.
A Paint Film Harder Than the Caulk Under It
Cured paint and cured caulk are not equally flexible. A dried paint film is a thin, stiff skin on its own, and once it sits on top of a caulk bead that is supposed to keep stretching underneath it, the paint film has to stretch along with the caulk every time the joint moves. A film built up too thick from repeated coats, or a harder oil-based product used somewhere a flexible latex would fit better, resists that stretch and is the first thing to crack even while the caulk beneath it is still sound.
The other way this shows up is timing. Caulk that is painted before it has fully cured can skin over on the surface while the material underneath remains soft. That mismatch between a firm painted surface and a soft core is exactly the setup for the crazed, wrinkled skin some beads show soon after the job. How long a coat of paint itself needs before it is ready for another layer is its own question; what matters here is that a bead painted too soon is working against itself from day one.
The Repair Sequence
A cracked bead does not get caulked over. A utility knife drawn along painted trim can skip off a slick edge into the hand steadying it, one more reason the removal is the painter's job. On trim whose coats go back to before lead paint left the market, a lead test comes before any blade touches the joint. The old bead then comes out: the painter cuts it along both edges and pulls the failed material free, including anywhere it has torn away from one side of the joint, because caulking on top of a bead that has already lost its grip only buries the same failure under a fresh layer that cracks again on the same line.
Older trim coats, laid before lead paint left the market, can hold lead under later layers. Cutting, scraping, or dry-sanding them throws lead dust, so a lead test comes first, and the painter does the removal.
Once the old bead is out, the joint gets cleaned. Dust, old caulk residue, or flaking paint left in the gap keeps the new bead from bonding to bare material on both sides, and a joint bridged over debris fails again. A fresh bead goes in sized to the gap, backed with a rod first if the gap is wide, and tooled smooth in one pass rather than worked over repeatedly. The new caulk needs its own cure time before a coat of paint goes over it, and rushing that step restarts the same cycle. Once it has cured, the trim gets repainted, feathering the new paint slightly past the bead onto the trim and the wall on either side so the repair does not read as a visible patch.
Frequently Asked Questions
The floor-level joint carries stresses the seam higher up does not: foot traffic, furniture legs and mop water, all landing at the bead. The floor itself can add to it: a wood or engineered floor moves across its width as humidity changes, the same way trim does, while a slab or a tile floor beneath the baseboard moves only a small amount. That combination can leave a baseboard-to-floor joint working through movement the trim-to-wall seam a few inches above it does not.
A slight drag line where the tool passed is a surface mark that the paint covers; it is not the same thing as crazing. Crazing shows up later, after paint has gone over a bead that has not finished curing underneath, and appears as a fine web of dry cracks rather than a smooth tool line.
It can hold. A joint that opens in the dry part of the year and closes in the humid part repeats the same range each year, and a bead laid while the gap sits between its widest and its narrowest has room to stretch and compress through that range. One laid at either extreme starts the cycle already stretched or already squeezed.
Location decides how much it matters. A cracked bead on a bedroom or hallway baseboard is a cosmetic paint issue. The same crack in the trim around a tub, shower, or sink deserves more attention because water runs there, and a failed seal can let it track behind the wall instead of just showing as a line in the paint.
Caulk's surface takes paint a little differently than painted wood does, so a slight sheen difference along the bead can appear immediately after painting. It is not a sign the repair failed. A second finish coat carried over the bead evens the sheen.
Press gently on the baseboard right at the crack. If the board itself flexes or pulls away from the wall under light pressure, that is a fastening problem, not a caulk problem, and it needs to be resecured before any new bead goes in. Caulk can bridge a gap that changes as materials swell and shrink in place; it cannot bridge one that keeps changing because the board behind it is loose.
Hire trim and baseboard painting with the joints re-caulked — the old bead cut out and replaced with a fresh, paintable seal built to move with the joint. True Coat Painting serves Reno, Sparks, and Spanish Springs. Call (775) 227-0618.