
Why Is My Epoxy Floor Peeling or Bubbling
You walked into the garage on a Saturday morning, and noticed a quarter-sized blister near the workbench. Then another by the door. By the next weekend a thin tongue of finish was lifting at the corner where the slab meets the wall, peeling back in a sheet that came up cleanly in your hand. The coating itself still looks fine. It just isn't attached to the concrete underneath.
That's the unsettling part of an epoxy failure. The film hasn't worn out, hasn't been chipped by a tool, hasn't been chemically attacked. It separated from the slab without leaving a clue on the surface.
Almost every peeling or bubbling epoxy floor traces back to one of five causes, and the first two account for the majority of failures. Once you see what's happening underneath, the fix usually isn't mysterious. Most of these problems started the day the floor went down.
Quick reference — what you're seeing and what it likely means
Match what's on your floor against the patterns below.
| What you see | Most likely cause | Urgency |
|---|---|---|
| Small bubbles 1/8"–1/2" across, scattered | Outgassing during cure or moisture vapor transmission | Watch — may not peel for years |
| Large blisters that crunch underfoot, water inside when pierced | Hydrostatic moisture from below the slab | High — coating is failing, slab is wet |
| Coating peeling in clean sheets, concrete normal underneath | Inadequate surface prep (no grind, no profile) | Replace — the bond never existed |
| Peeling concentrated near drains, garage door, or exterior walls | Water intrusion from outside, not slab moisture | Fix the water source first |
| Patches matching where a car parks, lifting in dark rings | Hot-tire pickup, sometimes combined with weak prep | Medium — system was undersized |
| Peeling only at edges or seams, center holds | Edge prep missed, or expansion joint coated over | Localized — can be cut back and patched |
| Yellowing then flaking on a sunlit floor | UV breakdown of an aromatic epoxy | Replace topcoat with UV-stable chemistry |
Each section below explains why it happened, how to confirm it, and what an honest repair looks like.
Moisture coming up through the slab
This is the most common cause of epoxy failure on residential and commercial floors — roughly half of the calls a contractor gets about a peeling garage or basement floor.
Concrete looks solid. It isn't. A four-inch slab works like a wick — moisture from the soil migrates up through the capillaries in the concrete, hits the underside of the coating, and has nowhere to go. Pressure builds. The bond between coating and slab fails. The film lifts in blisters that, when popped with a screwdriver, often have liquid water inside.
This isn't a chemistry problem with the epoxy. It's a physics problem with the slab. The original installer either skipped a moisture test, ran one wrong, or ignored the result. The standard test is a calcium chloride dome left on the slab for 60 to 72 hours. Most epoxies cap out around 3 pounds of moisture vapor emission per 1,000 square feet per 24 hours. Slabs over that number need a moisture-tolerant primer, a vapor barrier coating designed for high-emission concrete, or — sometimes — no coating at all.
How to confirm at home: pop a blister with a screwdriver. If water comes out, or the underside of the lifted coating feels damp, moisture is the cause. A second test — tape an 18-inch square of clear plastic to the bare slab, seal all four edges, and leave it for 24 hours. Beads of water underneath mean the slab is venting moisture.
The real fix is removing the failed coating, grinding the slab clean, installing a moisture-tolerant primer (or in severe cases a vapor-barrier coating), and rebuilding the system on top. Patching individual blisters almost never holds. The moisture finds new exits.
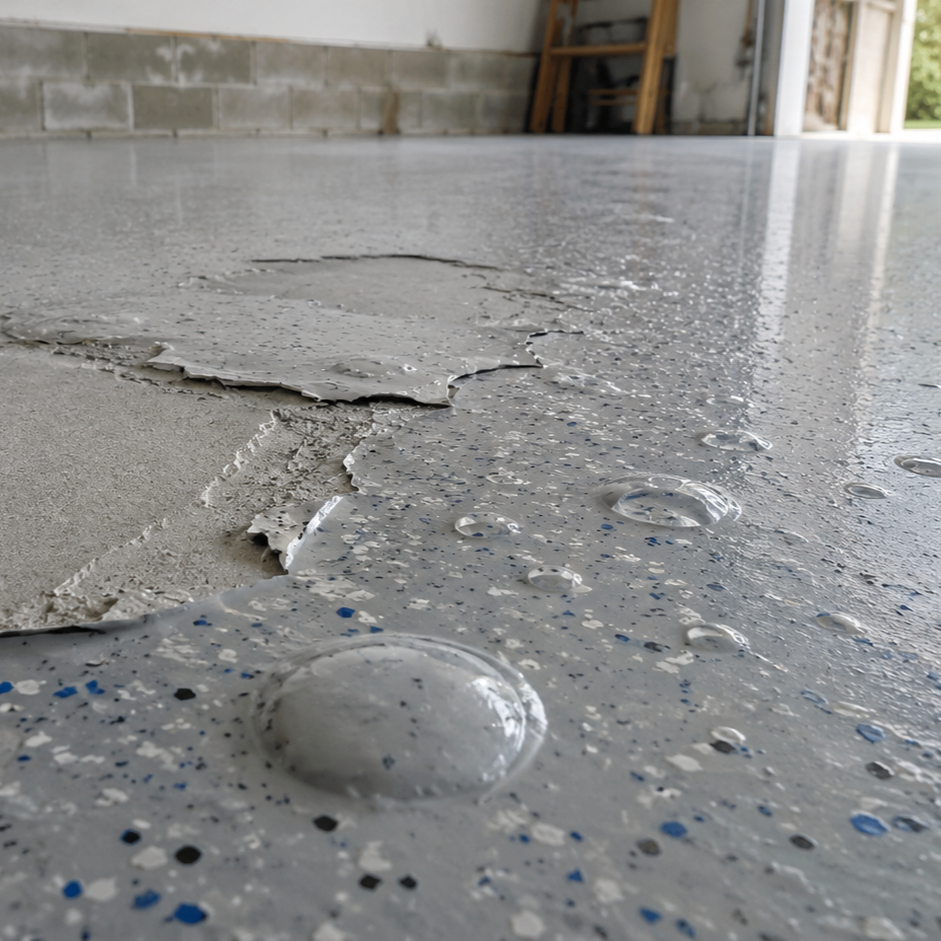
The slab was never prepped right
Epoxy bonds to concrete mechanically. It needs a surface profile — microscopic peaks and valleys created by diamond grinding or shot blasting — to physically lock into. Pour a coating onto smooth, troweled concrete, and the film looks beautiful for six months. Then it peels off in sheets the size of a placemat, taking nothing of the slab with it.
The shortcut that causes this is acid etching. Pouring muriatic acid on concrete to "open the pores" was the standard DIY-kit instruction for decades and still appears on many big-box product labels. It mostly does nothing. Acid softens the cement paste at the very surface but doesn't create the deep profile a real epoxy needs. The film bonds to the loose cement crust and lifts the day that the crust gives up.
How to confirm: lift a piece of the peeled coating. If the concrete impression on the underside of the film is smooth and shiny, you're looking at acid-etch failure. A correctly prepped slab leaves a sandpaper-like impression you can feel with your fingernail.
The real fix is the same as cause #1: full removal, mechanical surface prep with a diamond grinder or shot blaster to a CSP-3 profile (Concrete Surface Profile 3 — the industry standard for high-build coatings), and a fresh system on a real bond.
The recoat window was missed
A multi-coat epoxy system has a recoat window — a span of hours during which the basecoat is dry enough to walk on but still chemically reactive enough to bond with the next coat. Apply the topcoat too soon and trapped solvent blisters the finish. Apply it too late and the basecoat has fully cured, the surface is no longer chemically active, and the topcoat sits on it like a sticker pressed onto a wall that someone forgot to peel.
Most epoxies have a recoat window between 8 and 24 hours. Polyaspartics have windows as tight as 1 to 4 hours. A crew that gets distracted, pulled to another job, or hits weather that slows the cure can blow the window without realizing it.
How to confirm: peeled coating comes off as a clean, continuous film, with the basecoat below it still intact and bonded to the concrete. You're looking at two layers separated from each other rather than the whole system separated from the slab.
The fix here is sometimes localized — the failed topcoat is screen-sanded back, the surface is solvent-wiped, and a fresh topcoat is applied. If the failure is widespread, the topcoat gets removed entirely and the basecoat is mechanically abraded before re-topcoating.
UV breakdown on a sunlit floor
Standard epoxy is aromatic, meaning the resin molecule includes ring structures that absorb ultraviolet light. UV breaks those rings. The polymer chains fragment. The surface yellows, then chalks, then loses cohesion entirely. A film that has lost cohesion to UV doesn't peel cleanly — it flakes, like dried mud, in small irregular pieces that come up with a fingernail.
This affects garages with translucent doors, side windows, or doors left open during the day. It affects pure-epoxy driveways within two to three years. It affects basement floors essentially never.
How to confirm: the failure is concentrated where the sun hits. The shaded portion of the same floor still looks fine. The failed area is yellowed before it flakes.
The fix is replacing the topcoat with a UV-stable chemistry — usually a clear polyaspartic over the existing system. As long as the basecoat is still bonded and the slab isn't wet, this can be done without a full tear-off.
Outgassing bubbles that locked in during cure
Concrete is porous. Air pockets and trapped moisture inside those pores expand as the slab warms in the afternoon sun. If a coating goes on early in the day while the slab is cool and the temperature rises during cure, that expanding air pushes up into the wet film and gets trapped as the resin sets. The result is a peppered pattern of small bubbles — often 1/8 to 1/2 inch across — that don't mean the floor will fail, but never go away.
This is a workmanship issue. Coatings should go on a slab at the same temperature or slightly warmer than the air, not cooler. The afternoon pour avoids it; the early-morning pour invites it. Sealing the slab pores with a thin, lower-viscosity primer first also helps — it gives the air a place to escape before the main pour.
How to confirm: the bubbles are small, uniform, and present across the whole floor — not concentrated in one area. The coating is otherwise bonded. If they bother you cosmetically, a topcoat can hide them. If they don't, leaving them is the cheaper call.
What an honest repair looks like
A peeling or bubbling epoxy floor almost never gets repaired with a fresh coat poured on top of the old one. Whatever caused the failure is still there. New epoxy bonds to the failed film, and the failure propagates from underneath.
An honest scope starts with diagnosis — moisture testing the slab, looking at how the failure presents, identifying which cause is driving it. A wet slab means full removal, slab drying or a vapor-barrier coating, then a moisture-tolerant system rebuilt on top. A prep failure means full removal, mechanical grind to CSP-3 profile, and a fresh system on a real bond. A blown recoat window can sometimes be fixed by stripping just the topcoat. UV breakdown of a topcoat is often solved with a clear polyaspartic over an abraded existing floor. Pure cosmetic outgassing can be lived with or hidden under a topcoat.
What a homeowner should not accept is a sales pitch for "patch and pour" on a system that's actively failing. Coating over a failure buys six months and creates a bigger removal job for whoever comes next.
FAQs
For very small, isolated failures with no moisture under them, sometimes — sand the edges feathered, clean with a solvent wipe, apply a compatible patch material. But if the cause is slab moisture, weak prep across the whole floor, or UV degradation, patching is a temporary fix that fails again within a year. Figure out why the existing coating let go before deciding whether a touch-up is worth doing.
The reliable test is a calcium chloride moisture vapor emission test, run for 60 to 72 hours and reported in pounds per 1,000 square feet per 24 hours. The plastic-sheet test mentioned above is a cheap home-tester version — beads of water on the plastic mean the slab is venting moisture and a non-breathable coating will fail. A relative humidity probe drilled into the slab is the most accurate option a contractor uses, but it's also the most invasive.
Probably not, if the moisture is hydrostatic — coming up from the soil through the slab. A dehumidifier pulls moisture out of the air; it doesn't change what the slab is venting upward. In a basement with high humidity and a coating designed to breathe, dehumidification helps. In a garage with hydrostatic pressure pushing water up through a non-breathable epoxy, it doesn't.
A correctly installed system on a sound, dry slab lasts 5 to 10 years for residential epoxy, 7 to 15 for commercial epoxy, and 15 to 25 for a polyaspartic-topped hybrid. Peeling inside the first two years almost always means something was wrong with installation, prep, or substrate. Peeling in year eight or beyond is closer to end-of-life.
No. Small, scattered surface bubbles that formed during cure and never grew can sit there for years without the coating losing bond. They're cosmetic. The bubbles to worry about are the ones that crunch underfoot, hold liquid water when pierced, or grow in number over time. Those are active failures and the slab below them is wet.
It depends on what failed and why. If the original kit was acid-etch-only with no real surface profile, a pro can grind down to clean concrete and start over with a real system. If the slab is venting moisture above 3 lbs MVE, the same physics that defeated the DIY kit will defeat any non-breathable replacement. The first conversation is a moisture test and a hard look at the back of a peeled piece.
The diagnosis matters more than the product
A failed epoxy floor is rarely a product problem. It's almost always a substrate problem, a prep problem, or a timing problem. The same chemistry that failed in one garage works for two decades next door because the second slab was tested, ground, and coated when conditions were right.
If your floor is peeling or bubbling, the question to ask before pricing a fix is which of the five causes above is driving the failure. The answer is usually visible in the back of a lifted piece, in the moisture content of the slab, or in the pattern of where the failure shows up first. Once that's clear, the path forward is plain. Without it, the next floor will fail the same way as the last one.